Monday, 16 April 2018

Android Wear Crashing/Bootloop fix (UPDATE)


Hello and welcome. The step-by-step process is at the bottom of this blog for those that are desperate to get cracking (I share you pain!). For anybody else, here’s my story all about how my…….Huawei watch got stuck in a bootloop and how I stumbled upon a potential fix.

So it began


One morning, I woke up to find my Huawei Watch 1 inexplicably stuck in a bootloop. The Huawei logo would appear, buzz one or two times, then the Huawei logo would appear, buzz one or two…….

I was immediately googling for a solution and was recommended that I put the watch on charge through the mains and try a factory reset. It took hours of holding down the on/off button, waiting for the Huawei logo, then releasing the button after the first buzz but BEFORE the second buzz. Eventually 
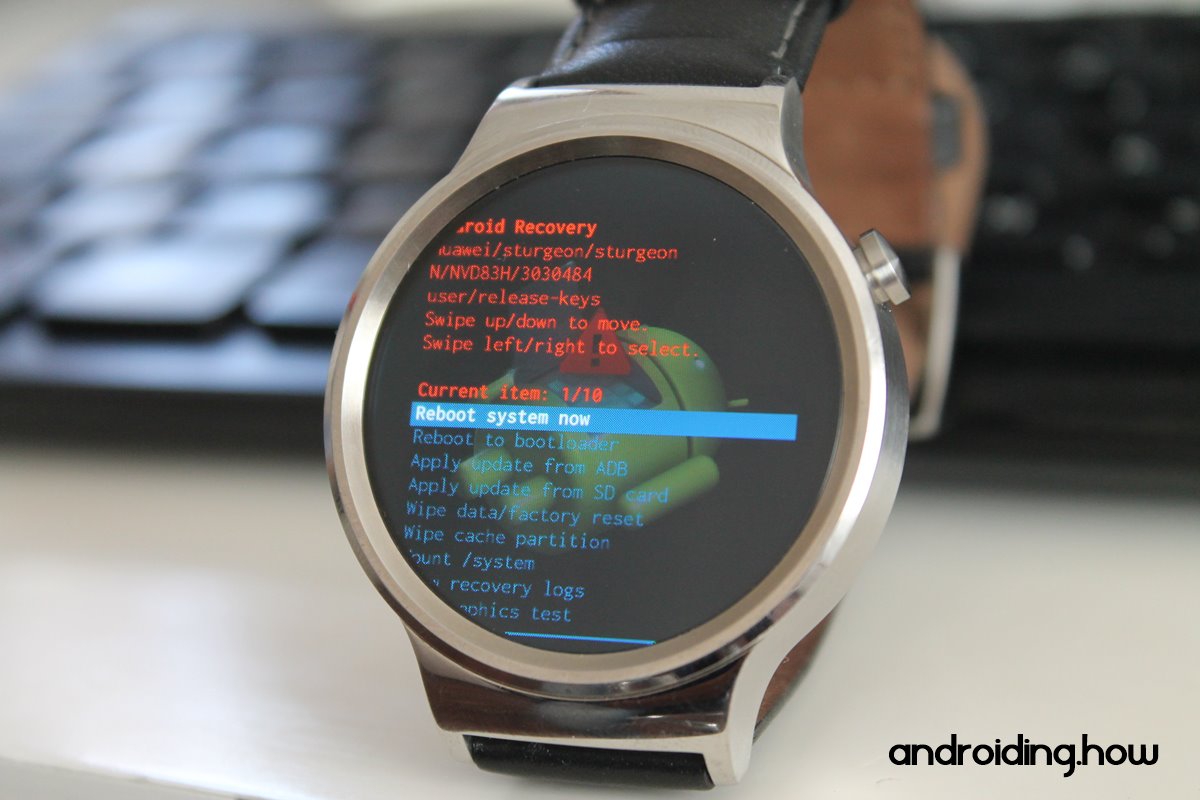
I thought I managed to bring up the fastboot menu (see first image below), pressing button repeatedly until 'reboot-recovery' appears, press/hold button until it reboots to recovery menu (see second image), swipe down to factory reset, and ok it, beating the crashing/bootloop cycle. Thank god!........Until the next day when it started buzzing like crazy and ended up stuck in a bootloop, Again!


This time I managed to get the fastboot menu up more-or-less straight away (practice makes perfect, hahahahaha, kill me), factory reset, then noticed it was back at the recovery menu asking me if I wanted to 'Reboot system now'. (See second image above) Oops! I figured this was the crucial step I was missing so rebooted the watch and hey presto! The watch was working again. Until the next day. The watch started buzzing like crazy as, this time, I noticed Google assistant was constantly trying to activate itself. Crash. Bootloop. Argh!!!!


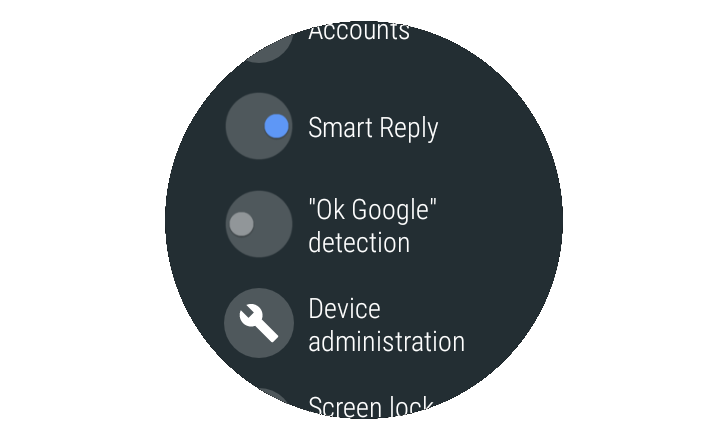
Another google and came across an article about how deactivating ‘OK Google’ detection can make an Android Wear watch run more smoothly. Last throw of the dice! Factory reset my watch. Went through the initial setup process then IMMEDIATELY deactivated ‘OK Google’ detection. At the time of typing this, it’s been almost a week since I did this and my watch hasn’t crashed once. If anything, the watch is working better than ever with hardly any of the stuttering it suffered before the crashing/bootloop issue. I’ve even, tentatively, used google assistant a few times (by pressing the button, obviously) without it crashing so fingers crossed…….


Step-by-step Process

  1. Make sure the watch is charging through the mains (not computer’s usb)
  2. Press and hold button until after the first buzz but before the second one (it may take a few attempts to do this before the watch is displaying the fastboot menu)
  3. Press button repeatedly until 'reboot-recovery' appears then long-press until watch reboots
  4. When recovery menu loads up, swipe down a few times until 'Wipe data/factory reset' is highlighted then swipe right
  5. Swipe down to 'Yes' then swipe right
  6. Wait for the factory reset to finish then swipe right when 'Reboot system now' is highlighted to reboot the watch
  7. After setting up the watch, go to settings/Personalisation/Toggle-OFF ‘Ok Google’ detection.
If this doesn’t work, or you really Must have 'Ok Google' detection, it looks like it will be either of the following. Manually installing the OS, which I wouldn't recommend unless the watch's warranty has elapsed and/or you REALLY know what you're doing (see links below) or replacing the watch. I wish you luck!

UPDATE


17/4/2018 - A day after writing this blog, it tried to happen again. Google Assistant attempted to activate itself but I managed to force-restart it (by pressing down & holding the button). It's worth noting that it got stuck on the basic clock with the loading animation (prior to the 'Android Wear' text) so force-restarted it again. This led to the low-battery symbol flashing before shutting down. I did get it to switch on straight away and it booted up completely to the watch face, telling me there was 9% power hence put it immediately on charge. It's been fine since then but suspect this blog will get bigger......

20/4/18 - Today, A Google Play update became available for Wear OS (from 2.10 to 2.11). My watch has been working fine but installed the update to be on the safe side. No dramas to report so far......

29/4/18 - It started happening again after the watch got drenched. Starting to think it could be water/moisture getting under the button and shorting it(?). Force-restarted the watch and has been working fine since..... 

31/5/18 - Noticed about a week ago, Google Assistant has been substantially updated (in appearance with extra functions, at least) and there's been no issues since the above update. Errrr, carry on.....


Article on disabling 'Ok Google' detection


Manually installing Wear OS


Wednesday, 27 June 2012

Sony Vaio E Series 17.3 (SVE1711X1E) - First Impressions


Specs
http://www.sony.co.uk/product/vn-e-series/sve1711x1e

U-tube Video Review by flyingxk aka ‘I Fly’
http://www.youtube.com/watch?v=Wh2vSc7dvbg&feature=plcp

Looks


As soon as I took it out of the box/wrapping it felt like a quality product due to the soft-touch plastics & weight (not too heavy but not the lightest either). Opening the lid/screen revealed a very nice looking laptop with details that elevated it from boring i.e. The subtle chrome surround around the touchpad.

Setting up


No need for an instruction manual. Just unwrap & plug the (very short) cable into the adaptor, then plug into the mains-in port on the far left of the laptop. A concern is the slight flimsiness of the mains-in port in the laptop. It plugs in securely enough but the port itself could be more securely fixed (as you’ll see in the link to the useful U-Tube video above & below this blog, I’m not the only one)

The Back-lit Keyboard


The positive initial impression continued when I press the on/off button. Windows did its thing then, ta-dah! The keyboard lit-up. Certainly has wow factor but I suspect I’ll be taking the back-lit keyboard for granted by next week & then turn it off (or at least it down) soon after. One reason is, while it’s fine when you’re looking down from above, it can be a bit much if you’re just slobbing it (low down) on the couch with the laptop next to you. But if you value your posture/spine, this isn’t such an issue. Additionally, it transpires it has auto-dim when it's not being used.

The Screen


Once the simple set-up procedure was done the desktop gives you a very good idea of the Hi-Res. The icons & letters are very small so you might need to increase their sizes if you have trouble with eye-sight.

One thing that struck me about the screen is the deepness of the blacks & the angles from which the images are viewable (the opposite of those cash-points where the images on the screen are only viewable from straight-ahead)

Usability


My first thought was ‘I’m gonna miss the left/right buttons below the touchpad. Guess that’s ‘progress’’ but, after 10 mins or so, realised they are there. It’s just they’re integrated with the touchpad itself so when you press down on the lower corners of the touchpad they click & work like on any other touchpad. So a clean modern look with the same usability.

The keypad’s good as well. I’ve noticed it’s harder to mis-type due to good spacing between the keys & the number pad is a boon (one of the main reasons why I chose this laptop). The only slight criticism is the keys seems a tad flimsy (when you press a key the ones surrounding sink slightly as well) but it’s just me nit-picking really.

Installation & Testing the Performance


One of the first things I did was install Norton Internet Security. I was really impressed with the speed of the installation. In about 15 minutes it was up & running & I was on the internet.

Next was Google Earth. Took a bit longer but still quicker than I remember on older computers. When I started Google Earth up, it became obvious the laptop had no trouble whatsoever. Even when zooming around the 3D buildings of New York the laptop didn’t break a sweat.

Next was a visit to U-Tube where I cranked up a video to the highest HD setting. Again, not a hiccup.

Finally, I tried gefs.com, a Google Earth Plugin-based flight-simulator. I’m sure you can work out how well the laptop coped……

UPDATE (01/07/2012) This weekend I purchased Civilization V & have been playing it extensively. I can sense it's pushing the limits of the Graphics card (at times down to very-roughly 8 frames a second) but copes perfectly well.

Overall, this laptop's performance is leagues ahead of my old Overheating-AMD (apparently not a fault!) Toshiba. Note: my mum's basic Pentium Toshiba works fine. Just thought I'd let you know. Anyway......


In Summary…..


In My Humble Opinion, this is a stonking laptop. Not perfect (slightly-flimsy mains-in port) but more than enough for internet use & all but the hardest-core gamers. Just realised I haven’t really tested the sound quality of the speakers but, from what little I’ve listened (the Windows 7 Startup), doesn’t sound too bad……hence, if you wan't the last word in sound or play the latest games, it's probably best to look elsewhere. Otherwise, this should be all the laptop you'll ever need.

Specs
http://www.sony.co.uk/product/vn-e-series/sve1711x1e

U-tube Video Review by flyingxk aka ‘I Fly’
http://www.youtube.com/watch?v=Wh2vSc7dvbg&feature=plcp

Thursday, 3 May 2012

What led me to sketchup modeling?

Thought I'd finally get round to creating my first blog. Hope it's not too tedious......

Work Experience


Way Back in 1997, I was a school-kid spending 2 weeks doing work experience at Hutter Jennings & Titmarsh Architectural Consultency. I was allocated a desktop (WOW for a kid who's only home computer was a Sega Mega-Drive Console) which had 2D AutoCAD. I'm sure I could have been more useful if I'd got my head round zooming, hence my attempt at replicating a supermarket tower-sign looked about right but was badly out-of-scale.
Still, I was vital in.........bringing cups of coffee/tea from the vending machine to the blokes. Yet playing around with CAD taught me a lot.

University Years


In 2001 I started a three year Degree in (BA Hons) Product Design at Sheffield Hallam University. This was when I first encountered 3D modeling. It was Bentley Microstation, dispite the programs' glitches (especially as models created in it get more complex), was amazed at the simple renderings I could personally achieve. This was where I first learnt the basic methods of 3D modeling.

My first ever 3D model. An assignment to design Chess Pieces (in early 2002, I think)


Beyond Part-Time 2D AutoCAD Course


In 2006, 2 years after I scraped through University with Third Class Honours (ahem!), I thought it would be a good idea to invest in a Part-Time 2D AutoCAD to add to my modest qualifications. I managed to pass that course reasonably enough but couldn't afford AutoCAD for my laptop. I searched for a (hopefully legal) free version of AutoCAD, but after no success, thought I'd try an alternative suggested by Google Search. The suggestion was Sketchup.


Experimenting with Sketchup


'Skewed Box'


When I first booted up Sketchup, it brought back memories of 3D modeling at University. My first impression was, while it did not have the lighting & other rendering capabilities of Micostation, I was amazed that this free program promised the ability to create 3D models in my own home.
My first model was 'the Skewed box', a box I turned into a group then skewed it (Image above).

My next model reflected my fascination with ancient wonders, hence a simple representation of 'the Great Lighthouse' of Alexandria (Image below). Even though it was little more than a Cone atop a Cylinder atop an Oblong atop a Rombus, I must admit I had butterflies in my stomach that I had created such a huge structure in my laptop. I stopped when I discovered 3D Warehouse & found a few much better versions of the tower created by other modelers......

'The Lighthouse'


Warehouse to 3D Warehouse


While working in my 'temporary' (in the end 4 year) job as a warehouseman, I overheard a supervisor, & generally good colleague, discussing a presentation about designs for a new layout for the Warehouse. Realising I was in a position to help out he agreed to lend me paper copies of plans so I could use them to create a 3D model of the new layout. I knew it would be challenging but I was curious to see what I could produce.......
In the end I was pleasantly surprised by what I created &, after the plans fell through, he gave consent for me to upload the Warehouse to 3D Warehouse.....

Why Damo?


It's my nickname so, because (at the time) I didn't take myself seriously enough to even put my real name to my 3DW account, I guessed my nickname (Pronounced 'Day-mow') would do & be spelt 'Damo'. I have thought about changing it as I became more competent & prolific in my hobby but I've become accustomed to it. Also, I still try not to take myself too seriously, dispite this self-aggrandizing blog, lol!